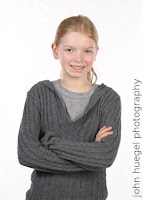
 Black and white imagery is powerful. You can completely change the mood of an image once you convert it to BW. Many beginning photographers don't understand that there are several ways to convert an image from color to BW. The method you choose will determine the appearance of your image.Let's start with this image. Shot in color, it has good exposure characteristics.The easiest way to convert to BW is to desaturate the image. The two ways to do this in a photo editor are to convert to Greyscale or to edit the Saturation to zero. This image shown here is an example of the color image above converted to greyscale or desaturated. The key difference between these is that the greyscale changes the color space to Grey, and the desaturation method keeps the color space, but removes the saturation. Many print labs want you to keep your BW images in the RGB color space, so desaturation is the preferred method in this example.
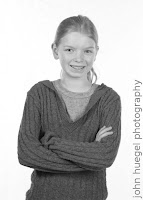 But in both cases, you don't have control over the grey tones. Often with this conversion, the skin tones will take a darker grey than you would like. In the example above, I am not happy with the dull grayness of our model's skin.The secret to good BW conversion is control over the colors which receive more lightness in the mixed down image. And the key to that is the "Channel Mixer".The channel mixer allows you to create a monochrome image in a color space and control the blend of red, green and blue. The default value would be 33% of each, resulting in pretty much the same mix as a desaturation. But if you change the blend to favor red, you can boost the skin tones without blowing out the image, as caucasian skin has more red color in it than blue or green.
 In this image, I used 55% red, and about 22% of green and blue each. The total signal information is the same (100%), but the skin tones are noticeably brighter than the desaturated image above.I encourage you to experiment with a favorite image. On one copy, use the desaturation method (go to the hue/sat/lightness control and pull the saturation down to the bottom), then create a duplicate image and play with Channel Mixer. Vary the blends of red/green/blue and see how the resulting images display.But Channel Mixer gives you some more creative control. If you go beyond 100% of the "mix", you can create some interesting effects, such as blown out highlights.You can also overdrive the signal levels and compensate with the "Constant" parameter and basically increase the black/white contrast levels. Here I chose red at 90% and blue and green at 20%, which normally would blow out the image at 130%. But then I lowered the Constant to -30% and it maintained the skin tones while creating more contrast with the dark tones. Notice how the model's eyes and sweater are now dark grey.
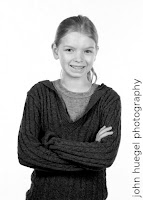 So, the next time you are working on an image and want to create some drama, go for the Channel Mixer tool. It will help you create strong black and white images, and give you the edge that your clients' drug store kiosk can't reproduce!
One of the most nervous moments a photographer has is arriving on site at their first wedding. Maybe it was a family/friend request, or someone who found you through a friend or another customer. But it's your first one! What do you do? Have you prepared for this day? Let's talk about how you can be best prepared, and deal with that first magical wedding gig.Equipment- Clean your lenses and pack your camera bag methodically before you leave your house.
- Know how to change your camera modes quickly and efficiently, in the dark.
- Have your spares close to you. Camera, batteries, lenses, whatever you have.
- Format your memory cards before you leave for the site. Nothing is more frustrating than shooting the first 30 shots and then realizing your card has tons of images from the last shoot.
- Consider getting an image tank device that will duplicate your cards to hard disc on location. Good insurance policy for around $100.
- Batteries. Lots of Batteries. If you power flashes with AA, get Lithium batteries. Take your chargers in the car so you can power up at the reception.
Technique- Drill into your head "check your barrel" - meaning don't shoot without confirming ISO, shutter, f-stop, mode, lens auto/focus, white balance, image size/quality settings.
- Know how to set white balance on your camera. Do it whenever setting or lighting changes. It will save you HOURS of time editing.
- It's digital...shoot more than you think. Look for environmental shots and crowd/response shots. You'll love those background shots for album layouts.
- Shoot 3 shots of every image, plus extras proportional to crowd size. For large formals, stay in one position and fire off 8-10 images. You'll have the right recipe to do head swaps for blinkers.
- One technique - tell everyone to close eyes and when you count three, they open and smile. Usually the first shot has no blinkers!
Flow- Do a walkthrough of the church or ceremony area. Understand lighting issues for the time of day.
- Meet the people in control and remember their names. Church secretary, catering manager, DJ, etc.
- Ask if there is a rehearsal at the church, and if you can show up. You can also shoot some shots of the people in rehearsal and include as before/after. You will also be treated more like "family" by the bridal party after the rehearsal.
- Talk to the officiating person at the ceremony, to know where you can and cannot be, and if there are times when it is inappropriate to shoot. Ask about flash; assume "no flash".
- Make a list of the key shots you want to get. Keep a pencil with you.
- Note the name of the principals, and use them. Bride, Groom, parents, wedding party.
- ID your "go to" person to help find others and resolve problems. Often this person is the matron of honor, but sometimes its a friend who is not in the bridal party.
Personal- Dress comfortably but not too casual.
- Depending on location and dress, it may be OK for men to not wear ties. Maybe a dark jacket and dark clothing. Slacks and comfortable shoes are good for both men and women.
- Don't let personal body adornments (tattoos, piercings) degrade your image.
- You will sweat. Lots of deodorant!
- Throw a bottle of water and a couple energy bars or granola bars in your bag. You don't want dehydration or low blood sugar to impact your shooting.
- Go potty once you get there...to lower the risk of "timing problems!"
- Turn off the cell phone. Do Not Text On The Job!
Business- Have business cards, and only give them out when asked.
Talk to bride and groom about whether you want to advertise web listing of the gallery, and print cards with their image if available.
People will ask you about your camera. It's the conversation starter. Be prepared to talk Megapixels.Probably not a good idea ever to drink at the reception. You can have a beer when you are uploading images at home.Emotional- You may be more nervous for your first couple of weddings than the bride or groom!
- Know how to relax yourself (focus, breathing, positive thoughts). Know how to recognize when you are agitated.
- Try to get some sleep the night before!
- You are expected to be in control. If your timeline is drifting or Uncle Bob is shooting over your shoulder, don't hesitate to be polite but firm. Think ahead of time the words you will use.
- Remember that you will be wired...adrenaline high. You may be a bit edgy so make sure you know how to turn on the "nice" and turn off the "snap".
In The End, Remember:- You will shoot better photos than anyone else in the room.
- You have permission to tell pretty much anyone to do anything...implicit permission from bride and groom.
- You will have hours after the event to decompress and think about what could have gone better. Don't worry about it until you leave the event.
- Be confident...they hired you because you are "you"!
 I'm still working on my technique with the light meter and custom white balance. This image only received a touch of sharpening and contrast enhancement.I shoot exclusively with Tamron f/2.8 lenses. I really like the narrow depth of focus that I receive with these lenses.This one was at ISO800, 1/1600 f/3.5. Nice focus. Nice color. Nice white balance. I like it!Can you tell I have spring fever?
 Black and white imagery is powerful. You can completely change the mood of an image once you convert it to BW. Many beginning photographers don't understand that there are several ways to convert an image from color to BW. The method you choose will determine the appearance of your image.


