 Black and white imagery is powerful. You can completely change the mood of an image once you convert it to BW. Many beginning photographers don't understand that there are several ways to convert an image from color to BW. The method you choose will determine the appearance of your image.
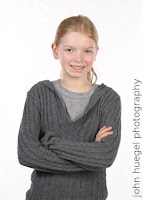
Let's start with this image. Shot in color, it has good exposure characteristics.
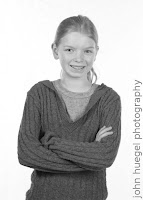
The easiest way to convert to BW is to desaturate the image. The two ways to do this in a photo editor are to convert to Greyscale or to edit the Saturation to zero. This image shown here is an example of the color image above converted to greyscale or desaturated. The key difference between these is that the greyscale changes the color space to Grey, and the desaturation method keeps the color space, but removes the saturation. Many print labs want you to keep your BW images in the RGB color space, so desaturation is the preferred method in this example.

But in both cases, you don't have control over the grey tones. Often with this conversion, the skin tones will take a darker grey than you would like. In the example above, I am not happy with the dull grayness of our model's skin.
The secret to good BW conversion is control over the colors which receive more lightness in the mixed down image. And the key to that is the "Channel Mixer".
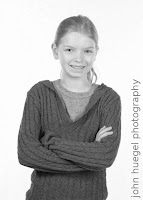
The channel mixer allows you to create a monochrome image in a color space and control the blend of red, green and blue. The default value would be 33% of each, resulting in pretty much the same mix as a desaturation. But if you change the blend to favor red, you can boost the skin tones without blowing out the image, as caucasian skin has more red color in it than blue or green.

In this image, I used 55% red, and about 22% of green and blue each. The total signal information is the same (100%), but the skin tones are noticeably brighter than the desaturated image above.
I encourage you to experiment with a favorite image. On one copy, use the desaturation method (go to the hue/sat/lightness control and pull the saturation down to the bottom), then create a duplicate image and play with Channel Mixer. Vary the blends of red/green/blue and see how the resulting images display.
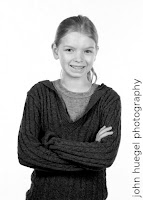
But Channel Mixer gives you some more creative control. If you go beyond 100% of the "mix", you can create some interesting effects, such as blown out highlights.
You can also overdrive the signal levels and compensate with the "Constant" parameter and basically increase the black/white contrast levels. Here I chose red at 90% and blue and green at 20%, which normally would blow out the image at 130%. But then I lowered the Constant to -30% and it maintained the skin tones while creating more contrast with the dark tones. Notice how the model's eyes and sweater are now dark grey.

So, the next time you are working on an image and want to create some drama, go for the Channel Mixer tool. It will help you create strong black and white images, and give you the edge that your clients' drug store kiosk can't reproduce!
Hi John,
ReplyDeleteThanks for the great post. You have nicely explained how to use the channel mixer tool with examples this gives a clear idea. I often convert my pictures to black ad white and I do this with the help of contenta coverter which is quite userfriendly. But I would definately try out what you have mentioned in your post. Its important to experiment