It just looks to me like the photographer stopped working once the shutter was pressed.
Image Editing Workflow
I believe that you need to touch each image to make it the best it can be. I have developed a workflow for editing images that I find to be efficient and provides good results. Here are the general steps I look at when editing a batch of photos. I apply this to virtually every image before my customer sees it, whether online or in proof/book form.
- Is the exposure correct? (correct over or underexposure)
- Is the color balance correct? (It is now for me, as I set custom WB before shooting!)
- Are the skin tones pleasing? (if the image is nice but skin tones are dull, the subject will not "pop")
- Is the image contrast range wide and pleasing? (are darks dark enough, and lights light enough?)
- Is the color saturation appropriate? (are colors dull and faded, or bright and exciting?)
- Is the image cropped properly? (too much dead space?)
- Are there any quick cosmetic or environmental edits that I should make? (zits, distracting stuff in the BG, eye bags)
Example
The first image of my daughter was taken during a scouting trip for outdoor locations for Seniors. This is a nice fire escape with good lines, color and texture. But to my eyes, it is flat. Part of that is because I overexposed the image a bit.
My first step was to crop the image a bit. I took the default 4x6 layout and applied an 8x10 crop rectangle. This shortened the sides and increased the emphasis on the subject. This first image is after cropping, but with no other edits performed.
IMAGE 1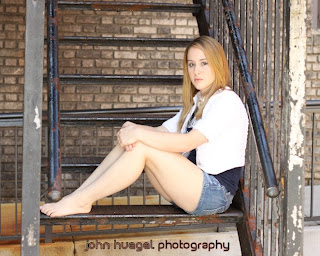
Next, I punched the contrast with the "Levels" tool, available in most any decent image editor. For me, I tend to pull the black point in past the tail of the black curve, then tweak the midpoint to bring the best exposure level to the skin tones. If I'm very underexposed, I may also bring in the white point. So here's image number two.
IMAGE 2

Next, I brought the saturation up a bit. This you can overdo, so I watch for the point at which either skin tones or background elements look artificially colorful. Then I back off a bit. For most outdoor stuff, I'm applying maybe 8-15% saturation. In this image, the difference is very subtle. Look at the hair color and rust tones in the background.
So before any special effects, here is the touched up image. With the hot keys I have in my editor (Paint Shop Pro X2), I can do this in about 30 seconds for each image, including the tweaking of settings between images.
IMAGE 3

For black and white, the same is true. Here's the same cropped image converted to BW using Channel Mixer (red: 60%, green: 24% and blue: 16%). I prefer this mix because it tends to bring out skin tones. But you can see it's still "flat".
IMAGE 4

So I go back to the Levels took and bring in the black point and nudge the midpoint. Now I like the overall balance better.
IMAGE 5

Conclusion
Amateurs don't often have the patience or skill to do these edits. The expect each shot out of their camera to be "good to go" and may be OK accepting drug store prints.
When you sell prints to someone, they are in your hands for just a couple minutes, until you package and deliver them. But they are on display in someone's home or office for years. You can't let a boring, flat print represent you for the next 2 decades.
You want your images to be exceptional, so that they will stand out from their amateur prints and those of other photographers who don't care enough to edit and print with care. You want the "wow" factor of your images to cause people to talk about the image and you. Spend the time with your images after you take them. Weed them down to the vital few, edit with care and taste, and make each image the best it can be. The impact on the customer will be significant, and your reputation as a true photographic artist will spread. Your killer prints will justify higher prices, and the word of mouth marketing will increase your business!
When I print I almost always print 4x6 photographs. So I crop my out of camera, unedited picture to an image size of 4x6. Then I edit the photo, as needed. Would you explain what you mean by the statement "I took the default 4x6 layout and applied an 8x10 crop rectangle"? Is your final photograph cropped to an 8x10 image? Or did you crop your unedited, out of the camera image to an 8x10 crop rectangle and then crop the image again to a 4x6 size?
ReplyDeleteI cropped this image to an 8x10 aspect ratio just for this discussion. I usually keep the images in 4x6 in native resolution for my first edits. If I have to crop in, I'll usually keep the 4x6 ratio even though I'm zooming in on the image. I have to make sure to keep enough room to do 8x10 crops (room on the short side). I don't know what size my customer will want, so I keep lots of space in the image. Gallery wraps also take a lot of outside space for the wrap.
ReplyDeleteOnce my edits are done, I move all of the edited images to an "edits" folder, then run a resize script to copy them to an "edits-resized" folder at 4x6" 300 dpi (1200x1800 pixels). This is perfect for sending to my lab for proofing - it's fast.